The purpose of the Chameleon Academy is to give you the background so you truly understand the “why” of it. But different people have different needs and, therefore, this module is broken up into four sections. You may click the link of the section that best describes your needs at this moment.
What is the Chameleon Kit?
Click here if you would like a thorough introduction to the kit. I’ll bring you up to speed on the controversy surrounding this product and go over each of the items included. This is for people who are shocked at the social media response and would like a clear headed explanation of the situation.
How do I set up the Chameleon Kit so it works?
You have the kit and, even if you are going to be transitioning to a larger cage, your chameleon needs a home. This section leads you through a simple step by step process of setting up the Chameleon Kit. With a few strategic additions the Chameleon Kit can provide a good home for a small or juvenile chameleon.
How do I transition to a permanent set-up?
Once your chameleon gets bigger than 2.5″ from snout to vent (nose to the start of the tail) the Chameleon Kit becomes too small. This section lays out a plan to transition to larger cage system.
You can listen to this information anywhere!
Significant parts of this information is contained over two podcast episodes. Episode 132 of the Chameleon Breeder Podcast (Renamed the Chameleon Academy Podcast in 2020) describes making the Chameleon Kit work. Episode 171 of the Chameleon Academy Podcast is on making the transition from the Chameleon Kit to the permanent chameleon home. You are able to play these episodes on any podcast player. Just search for the Chameleon Academy Podcast and search for the November 14, 2019 episode and the Nov 27, 2020 episode ). You can also download the free Chameleon Academy player app on either the Google Play store or iTune app store. With this app you will have access to every episode – including the bonus episodes. Or else you can simply play them here by clicking the play buttons!
What is the Chameleon Kit?
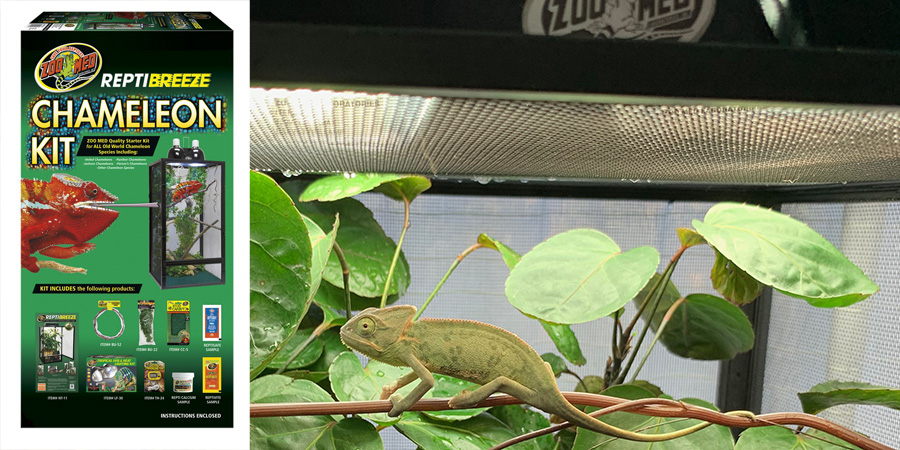
Perhaps the most common cage chameleon keepers start off with is the Zoo Med Chameleon Kit. It is a kit designed to be inexpensive and allows a customer to take their chameleon home that moment with a collection of items that will give the barest minimum of care. Although an experienced chameleon keeper can take one look at this setup and know it is insufficient, a person new to the community will have no idea that they must change almost everything to have a long life with their chameleon. This is further complicated by the sales person presenting the kit as a permanent solution. Of course, the marketing on the package makes some pretty bold implications which are misleading at best. The compatible species listed on the box are compatible only for the first months of their lives. And a significant number of Chameleon Kit people that I come across on social media were sold chameleons that had already out-grown the cage.
Calling Zoo Med to inquire about this will receive a response that essentially says that the kit is meant just to get the chameleon home and give the keeper time to get the permanent set-up. So the inclusion of the Chameleon Kit on this website is not a recommendation for this product, but as a guide to how to make the most of what you have and I will lay out the steps to take towards getting the permanent set-up.
How long your chameleon will be able to thrive in a cage of this size depends entirely on how big the chameleon was when you got him and the species. Due to species growth rates, you will have more time with a Jackson’s Chameleon than you would with a Veiled Chameleon. 3″ snout-to-vent length (nose to the beginning of the tail) is the absolute maximum length that could reside in this cage. I am much more comfortable with 2.5″ being the maximum, though. I also want to address the thought that a small chameleon needs a small cage. This is just 100% untrue. They can handle being in a small cage, but they do not have to be in one for their health and it is quite easy to provide for a baby chameleon’s needs in an “adult” size enclosure. It will not hurt a baby to be raised up in a smaller cage if done properly, but please do not consider this kit because you feel you need a smaller cage.
If you have been linked to this page from well intentioned individuals and are a bit shell shocked as to the response you got on social media know that you are not alone. This kit is incredibly popular with the retailer because it is easy to stock and inexpensive. If customers were presented with the price tag of a solid chameleon caging system there would be far fewer impulse buys. It is not fair to the people who purchased a chameleon because they didn’t think that they had to invest many hundreds of dollars further into this animal. But it is also not fair to the people willing to spend what it takes to give their new chameleon the home it deserves. There are serious health problems that can arise from the use of this kit. I will go over how to avoid these. But it is common for new keepers to, understandably, not know the signs of disease until it is too late and far advanced. Some straight forward changes could have prevented suffering in their chameleon. So, if you have been sent here by a flamed out social media post you can rest assured that everything will be explained here.
First, Let’s go over what comes out of the box:
- Cage
- Vine
- Carpet
- Plant sprig
- Repticalcium
- Reptivite
- Thermometer
- Light fixture
- UVB bulb (13 Watt)
- Daylight Blue heat bulb (60 Watt)
- Reptisafe sample

Repti-Breeze Open Air Medium Screen Cage (16”x16”x30”).
Analysis: This is an acceptable cage to start off with and is appropriate for a single chameleon up to about 3” in body length, or, what we call snout-to-vent. (In the podcast I said 4″, but I think I would rather err on the side of caution.) Snout-to-vent length (SVL) doesn’t count the tail. There comes an issue if you purchased a chameleon larger than this or you have come home with a pair. Yes, the sales person should have known better, but here we are. We’ll look into this more after we go through all the other goodies in the box. At this time, I’ll warn you that, even if you got a chameleon 3″ or less SVL, that your chameleon will grow fast and will outgrow this size cage within months.
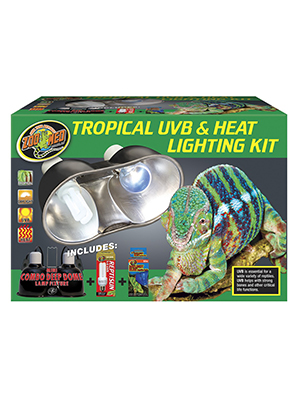
Tropical UVB & Heat Lighting Kit.The next thing we have is dual position light fixture which holds two lights. The lights included are the Daylight Blue 60 Watt basking bulb and a Reptisun 5.0 13 watt mini compact fluorescent bulb.
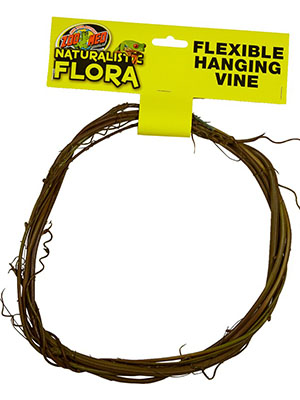
Flexible Hanging Vine.
Analysis: This is a smooth plastic, flexible vine that can be used to provide perching locations for juvenile chameleons. You get a generous 6 foot length and this is a very useful tool for this cage.

18″ Plastic Plant Sprig.
Analysis: This is a nice size “sprig”, but this will not be sufficient for the needs of a chameleon. It is most suited for being a surface that water can be drunk off of, but will not be able to perform any “cover” functions. We will have to bring in other plants.

Digital Thermometer. This thermometer has a remote probe that can be hung anywhere in the cage so you can monitor the cage temperature.
Analysis: It is not a bad idea to be keeping track of your environmental conditions so this will be handy for us setting up the cage.

Eco Carpet (5 gal, 2 pack).
Analysis: As we have learned in other modules here, having something absorbent on the floor is the wrong way to deal with moisture. Combining moisture, poop, and escaped feeder insects is not the right direction. Don’t even bother opening the carpet up. We won’t use it. If there is water on the floor we want it to evaporate as soon as is possible.

Calcium without D3 (sample).
Analysis: Calcium is an important supplement for chameleons, especially if we feed crickets! A sample is included that will last a week or two.
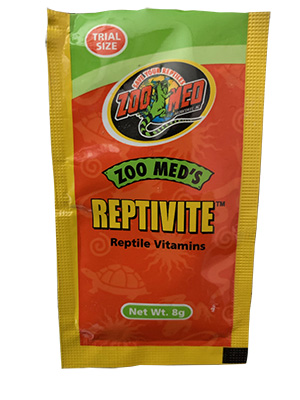
ReptiVite™ with D3 (sample).
Analysis: Reptivite is a vitamin/mineral powder which is given in a sample form. This one will last you two to four weeks depending on how it is used. There are two versions of Reptivite – one with and one without vitamin D3. It is a very important difference. The sample included in the kit has D3.

ReptiSafe® Water Conditioner (sample).
Analysis: This is meant to condition water and remove chemicals in tap water. This can be used if you use a dripper. I do not use this product in my drippers, but it does no harm if you would like to.
How do I set up the Chameleon Kit so it works?
How long the Chameleon Kit will be suitable for your chameleon depends entirely on how big your chameleon is. I had a car break down and was stuck with three rare baby chameleons in deli cups. A local pet store with a Chameleon Kit became the perfect solution for a temporary cage. For all the criticism this kit receives, it will do a good job of giving your chameleon a temporary home while you work on putting together a permanent residence. The two biggest problems are the vendors and pet stores who sell this as an acceptable permanent solution and the difficulty in using the items included in an effective manner.
This section assumes that you are setting up the kit as a temporary home. The strategies here are chosen to be the most cost effective with an eye to purchasing things which will be able to be transferred to the permanent cage set-up. We will use what we can from the kit, but will have to add on some items to give you a few of months of healthy chameleon life.
To properly set up the Chameleon Kit we will need a handful of other items.
Additional things we need
- Plants
- Handheld Mister, Dripper, and Drainage Solution
- Stronger UVB
- Light!
I will discuss each item and offer shopping tips within the section below. I would suggest reading through the entire set-up section to understand what is needed, purchase the items needed, and then do the actual building of the cage.
Step 1: Assemble your cage
How hard can it be to screw 7 panels together? Well, not very hard. This is a simple step and the instructions inside are pretty straight forward. Though, if this is the first time you are putting together a screen cage things are never obvious. You can review some insight in assembling screen cages if you have any doubt or would rather learn the tips and tricks up front.
Step 2: Create a "Forest Edge"

Here is the most challenging part of new chameleon ownership. That is seeing the world through your chameleon’s eyes and needs instead of your wants. What this means is that even though chameleons have colors, patterns, and horns/casques that fascinate us, they remain an animal that does not want to be disturbed. They will tame down and even get to recognize you and be without fear. But they are still chameleons and chameleons feel most secure when they can feel hidden in the leaves. Thus your most challenging thing in all this is to put your desire to see your chameleon at all times on-demand aside and embrace your chameleon’s emotional need to be able to control when they are seen and when they are hidden. The good news is that as they get used to you and understand that the cage is their territory and safe place that they will spend more and more time out in the open where you can see them. But they need that option, especially in the beginning, to hide in the leaves. Have you seen people post beautiful cages with waterfalls and plastic plants draped all over. And it is all set-up to frame the chameleon that is stuck in the center. It looks great to us! But that poor chameleon is on display 24/7. That would be hardly comfortable for a social species such as us humans. How do you think the chameleon feels always on display for humans that, in many chameleon’s minds, register as potential predators that may eat them? So, give your little buddy what he needs to feel secure and he will reward you will calming down and starting to show his own personality.
The simplest way I could figure out how to explain what a chameleon needs is the Forest Edge 4+4 method. This system provides a checklist for you to make sure you hit all the important points. (Of course, I’ll explain it all here!)
The main difficulty with this cage is its size. For us to create an acceptable chameleon environment we need space to create gradients of Heat, UVB, Humidity, and Exposure (the ability to hide or not). Those take space and space is at a premium in this size cage. Going forward in this section I am going to guide you as to what to do without explaining much of why. I want you to know the “why!, but I understand that, in this situation, time is of the essence. So, I will guide you how to set-up this cage without a lot of background theory as to why I am doing it. But, rest assured that everything I am saying here has a full explanation and I will link to those references in the Action Item section.
My mission with the plant cover in the cage is 1) to provide cover so the chameleon can hide himself when needed, 2) a surface from which to lap up water droplets, and 3) thick cover to protect from the lights above. You might be realizing, at this point, that a dense thicket of leaves will take care of all three. You especially need that thick leaf area to be in the upper third of the cage which is where the chameleon will want to be. Every situation will be different depending on what you can find in your area. In this particular case, I choose a “Ming Aralia” (or Polyscias fruticosa) and an Umbrella Plant (Schefflera arboricola) because they reached to the upper area of the cage. We want to have a clear basking area, but under that I am looking to have dense leaves to the point where my chameleon can hide in them and not be seen from any side. This is where a screen cage adds extra challenge, but house walls can help block the view and provide a safe area. Chameleons are very visual and know from which directions they are vulnerable. A Peperomia obtusifolia plant at the bottom is used for aesthetic purposes to hide the larger pots. The chameleon will not interact much with a plant at this level.
Looking at the picture you can see how the selection and placement of the plants provides a dense enough leaf cover that my chameleon can find a place to hide at multiple levels in the cage.
Action Item:
- Buy Plants to fill your cage. Go to the Nursery section of your home improvement store or any place that house plants are sold. Plants sold as “House Plants” are easier to start with as they require lower levels of light than the ones in the landscape, or “full sun”, section. You are looking for a plant combination that will provide a dense leaf cover int he cage. So you have 30″ of height to fill. I choose two Aralia stumps and a lower level plant in front. This worked very well for me. But what you pick up will be greatly dependent on what is available. As fr as poisonous and dangerous plants, this is a tricky subject. Chameleons don’t react to plants like dogs and cats and so the toxic lists are not an accurate guide. We have no records of plant toxicity in chameleons with our standard house plants so there is not much to go off of. But you can review a chart of plants that have been used in chameleon cages over the decades without issues. Anything labeled “Veiled Tested” has been verified to be eaten by a veiled chameleon without negative effect. You need to have enough leaves in the top half of the cage so that the chameleon can comfortably hide from view behind them.
Further Research into Plant use:
Of course, there is so much more than can be said about plants and setting up the cage. This is a summary. If you would like to dive deeper, here are relevant links:
Plants for Chameleon Cages: This page presents how to use plants in a chameleon cage and discusses plant toxicity and how it relates to chameleons.
Forest Edge 4+4 Method: This page introduces a simple method to put together a chameleon cage and to make sure you have fulfilled each important point.
Hydration: Misting, Drippers, Foggers, and Drainage
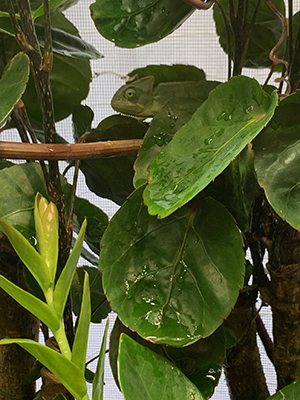
This Veiled Chameleon is waking up to leaves covered in “dew” where he can drink if he needs a water “top off”.
With every system you will need to figure out how to hydrate your chameleon. The most efficient way to take care of this with the Chameleon Kit is with a hand sprayer set to a fine mist. You are easily able to coat all the leaves in the cage with a layer of morning dew for the chameleon to lick the water from. You can do this three or four times a day as a temporary hydration measure. A review of other sections of this website will show that this is not truly a sufficient hydration approach. If you are, for whatever reason, going to be keeping this set-up for a number of months then it is worth putting some thought into your hydration strategy.
The ideal hydration schedule is high humidity nights, the chameleon waking up to a dew covered world, dry days with a short dripper session in the late afternoon. The afternoon dripper is meant to be an insurance policy for adequate hydration. The high humidity nights and dewy mornings should be all that your chameleon needs to be hydrated and he should ignore the afternoon dripper. If he drinks from the afternoon drip session then you know he is not being hydrated enough from the night humidity and dew. In this case, keep up the dripper sessions and extend fogging or add a misting session just after midnight. I will link to a page that explains hydration in detail. But for now, I will describe how each hydration method pertains to the Chameleon Kit situation
- Automatic Misters: This is a great piece of equipment for chameleon husbandry, but is too powerful to be placed inside a 16″ x 16″ x 30″ cage space. This is a perfect hydration device for the larger, adult size cages. You could have the mist head above the cage and pointing down, but then you lose the ability to have lights on top. There isn’t much room up there! The bottom line is that an automatic misting system is definitely on the shopping list in the transition phase, but is not used in the set up phase.
- Hand-held Sprayer: Hand held sprayers set to fine mist work very well for focused spraying. I recommend these for laying down a layer of dew in the morning right before the lights come on. Chameleons hate being sprayed So spry them as little as possible as you are coating the leaves.
- Dripper: Anything that gives you a slow drip can be used, but there are commercial drippers available. DIY solutions include IV bags and pin holes at the bottom of party cups. But I personally use the ZooMed Mini-Dripper. This dripper can be used with the adult set-up so purchasing this now will not be wasting money.
- Fogger: High night time humidity can be created by a fogger, often called an ultra-sonic humidifier. This humidifying method is used because it creates a focus “beam” of fog which can be effective in a screen cage whose main characteristic is ventilation. When using a screen cage, the only other way to get humidity in the cage is to humidify the entire room. An additional step to control humidity is to make the walls solid and this will give you much more control over humidity. You can do this by attaching plastic tarp on the cage sides. But this is dangerously close to investing time, money, and effort in the wrong cage. That said, it doesn’t hurt to practice your techniques and skills on a temporary cage!
- Drainage tray: So water comes into the cage. Where does it go? Any water that hits the bottom of the cage will sit and evaporate – unless there is enough to flow. In this case, it will flow over the edge of the non-water tight cage bottom. You can either calibrate your misting and dripping so that you do not get enough water on the bottom to flow or else find a suitable drainage tray. Note that a suitable drainage tray must be under the cage. The trays offered by ZooMed that go into the cage are substrate trays and, although they are sold as water catchers, are the wrong tools for the job. A tray that keeps water inside the. cage keeps water and oop marinating together in an unhygienic soup for escaped feeders to run through. Bad news. This is the same unhygienic situation you get when you use paper towels, puppy pads, or, for that matter, the carpet sections included in this kit! But, ZooMed does make substrate trays for all the cage sizes so we can find a suitable drainage tray for the Chameleon Kit cage if we just get the substrate tray for the next cage size up! So look for the substrate tray for the 18″ x 18″ (Reptibreeze Large) cage and the Chameleon Kit cage will fit nicely inside. You can also add blocks of wood or plastic to raise the cage up so it does not sit in the water.

In a small cage, like the Chameleon Kit, automatic misters can be too powerful. A hand sprayer will do the job adequately while you work on your permanent cage set-up.

A dripper can be as simple as a party cup with a small pin hole at the bottom.
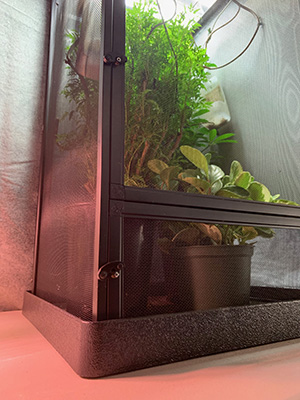
The substrate tray for the next size up cage actually makes a decent drainage tray for the Chameleon Kit.
Action Items:
- Determine how you will get water to your chameleon. If you are having a tough time with all the options then go for the spray bottle option and spray down the cage once in the morning and once in the late afternoon. This is the minimum. Really, any spray bottle will do. If you can spend a little more money then incorporate the dripper and/or fogger. Both the dripper and the fogger will be able to transfer to the final adult cage so this is not money wasted. The spray bottle is a laborious approach to an adult sized cage and so that is when a misting system is appropriate to buy.
- Figure out where the drainage solution. I have a tray linked below from Amazon. Any tray will work. Just make sure the cage is raised out of the water in the tray.
Further Research into Hydration:
Hydration is one of the most important aspects of chameleon husbandry and we are just starting to get it right. It is well worth investigating, studying, and truly understanding. Below are some relevant links to give more details into this subject:
Chameleon Hydration: This page discusses hydration over a 24 hour period and gives actionable steps to implementing it in the captive environment.
Ep 89: Naturalistic Hydration for Chameleons: This podcast episode talks through the concept of natural hydration cycles over a 24 hour period. This is an important episode that was instrumental in sharing thee concepts in an executable form.
Ep 10: Chameleons and Drainage: If you want to learn more about drainage, here is a supplemental learning podcast discussing the philosophy and execution of drainage strategies.
Any hand spray bottle will work for a mister. Home improvement stores or even grocery stores will have them. I prefer pressure sprayers that allow you to pump air pressure in and then the spray comes out with out constant wrist action. Of course, there is not a whole lot of space to mist so this isn’t a big deal. Just make sure you are not spraying the chameleon directly as they will not like this – especially if you are using the pressure mister.
This fogger has been my go-to as it is top filling (you don’t have to take the reservoir off to fill it with water), it has a 4 Liter capacity, and it has a dual output hose so you can guide the fog to two areas in the cage. The timer is cyclic so is useless to us. It is best to plug it into a standard appliance timer and run it that way.
Although I use simply a party cup with a pin hole at the bottom, a commercially made dripper is available at the above link.
The above link allows you to choose which size you are wanting. Pick the 18″ x 18″ size!
UVB Lighting: The tenuous situation and how to fix it
The most serious challenge with the Chameleon Kit is the underpowered UVB light. The major issue is that the effective range of this light is just a couple inches below the light and it loses power quickly. With no instructions on how to hang the provided vine horizontally 2″ below the light, the chances of beginners thinking they have UVB coverage and not having UVB coverage are high. This is actually worse than having no UVB at all because the keeper needs to go through an extra level of scrutiny by an experienced person to determine that they, in fact, do not have UVB coverage they thought they did. The result, of course, is no vitamin D3 and no absorbed calcium and the deadly Metabolic Bone Disorder setting in.
The two steps to setting up the Chameleon Kit with sufficient UVB are to first set up the included UVB Compact Fluorescent Lamp correctly and then to get the adult cage size lighting and just raise it above the small cage to accommodate its strength.
Setting up the 5.0 13W CFL is actually quite easy. You get the target UV Index of 3 at about 2″ below the bulb. So you simply have to adjust the bendable vine, or any basking branch, so that the back of the chameleon is 2″ from the bulb. If your chameleon is about 1″ high then you run the included vine three inches below the 5.0 CFL. Ths sounds simple. And it is. The reason why there are so many case of MBD with the kit is because this is not in the instructions.
As soon as possible, though, buy the UVB system necessary for the adult size cage.
There are many lights and fixtures that will work. I suggest a quad T5 fixture with one of the 6500K fluorescent bulbs replaced by an Arcadia T5 6% UVB bulb. Raise this fixture above the cage so that the basking branch/vine is about 6″ below the 6% UVB bulb. You will also need to make sure your plant foliage in the cage is thick enough that the chameleon can get out of the UVB light. Your chameleon needs to be given the chance to get out of the UVB light.

To set up the included UVB light effectively you’ll need to set the basking vine/branch so that the back of the chameleon is two inches from the UVB lamp. But, because of the innovative dual dome design, you have to make sure the heat lamp is not too hot at that distance. Luckily, the bendable vine included in the kit can be used to quickly change the distance from the heat bulb if need be. This UVB requirement is a major reason why the system will not accommodate a chameleon beyond 2.5″.
Daylight for Chameleons:
You will notice that I have supplemented the daylight lighting. The UVB and heat lamp combo unit does nothing for lighting the entire cage so the plants can live and the chameleon can feel like he actually has daylight. I have used dual T5 fixtures with 6500K bulbs, but these can be tricky to find. I have also used the Arcadia Jungle Dawn LED light bar and have been happy with the results. I have it linked below.
This fixture has quickly become my favorite due to its slim dimensions and each bulb having it’s own reflector.
Further Research into UVB & Chameleons:
UVB is a deep and complicated subject. To learn more about it you can check out our module on replicating the sun
Nutrition: Using the Supplements

One positive aspect of the Chameleon Kit is that the supplements included are up to current husbandry standards. Currently, the standard supplementation schedule is some variation of plain calcium every feeding and a multivitamin every two weeks. This multivitamin contains vitamin D3 and pre-formed vitamin A. And this is exactly what is included at sample doses in the kit. Repti-Calcium is a plain calcium powder and Reptivite has both vitamin D3 and vitamin A. Usually, in our chameleon husbandry, we want to derive the vitamin D3 from the UVB. The supplement with D3 every other week is not concerning. Although both vitamin D3 and vitamin A are fat soluble and can be overdosed, there is a wide range of error on both. To get an idea of the latitude we have, it is common to give Repashy Calcium Plus every feeding for some panther chameleon breeders. Repashy Calcium Plus has 20k IU/lb of vitamin D3 and 200k IU/lb of vitamin A. Reptivite, on the other hand, has half that at 10k IU/lb and 100k IU/lb. So, at least for panther chameleons, it should be safe to give Reptivite every feeding. The reason why this is of particular interest is because of the weakness of the UVB bulb and the precision necessary to use the UVB in such a small effective zone. Thus, if there is any doubt in the UVB exposure, we can make up for it by increasing the use of Reptivite to twice a week. This should provide enough D3 to make up for lack of UVB. And if they do get UVB then the body will shut off production once the stores are filled. So, as long as we do not over dose through diet, we will not have an over dose situation.
The sample packs will soon be used up so it is worthwhile to adopt a cares heet from a source you trust and get on to the supplement routine that you feel comfortable with. Almost all of them will be slight variations on the formula of plain calcium every feeding and the multi-vitamin every other week.
Plans:
- Confident in UVB levels: For Veiled and Panther chameleons, use Repti-Calcium every feeding and Reptivite every other week. For Jackson’s Chameleons and other supplement sensitive montanes, dust with Repti-Calcium every feeding and dust with Reptivite once a month.
- Not Confident in UVB levels: Calcium every feeding and Reptivite twice a week.
Action Items:
You will soon run out of the samples given to you in the kit. Find a care sheet for the species you are working with and follow the supplementation schedule listed there. If you already bought the supplements that the pet store suggested you buy then you will need to learn about those particular supplements. As supplementation is a very complex subject you may elect to ask a trusted keeper to help sort out all the options and determine if what you have is sufficient. If you plan on sticking with the Repti-Calcium and Reptivite be aware that they both come in version with and without vitamin D3. Get the Repti-Calcium without D3 nd the Reptivite with D3.
Further Research into Supplementation for Chameleons:
You can learn about supplementation at the following links
Chameleon Nutrition Basics: An overview of the status of chameleon nutrition and the part supplementation plays.
Ep 125: Chameleon Supplementation Basics: A podcast episode reviewing the basics of supplementation
How do I transition to a permanent set-up?
Step 1: Stabilize your current situation by following the How To Set-up Your Chameleon Kit section. It will take time for you to select, purchase, and receive your new items. How quickly you are able to receive your items determines how permanent you need to make your temporary Chameleon Kit set-up.
Step 2: Purchase appropriate UVB and white light lighting systems.
Step 3: Select and purchase an appropriate adult size cage. The first item to purchase is your adult size cage. It is this cage that will dictate what size light systems (including UVB) will be purchased.
Step 4: Purchase Hydration/Drainage Solution.
Go to this link for a set-up guide for your permanent cage
Conclusion
Setting up the Chameleon kit must be done correctly to avoid medical issues. Once you have that under control it is time to do the transition to the adult size cage. There are many options for this and many people who have opinions as to how it should be done. The good news is that all these different opinions generally work out! But for guidance on how to figure it out yourself or wondering why we do what we do there is no better way than to start at the beginning with the Chameleon Academy Basics Course and work from there!

