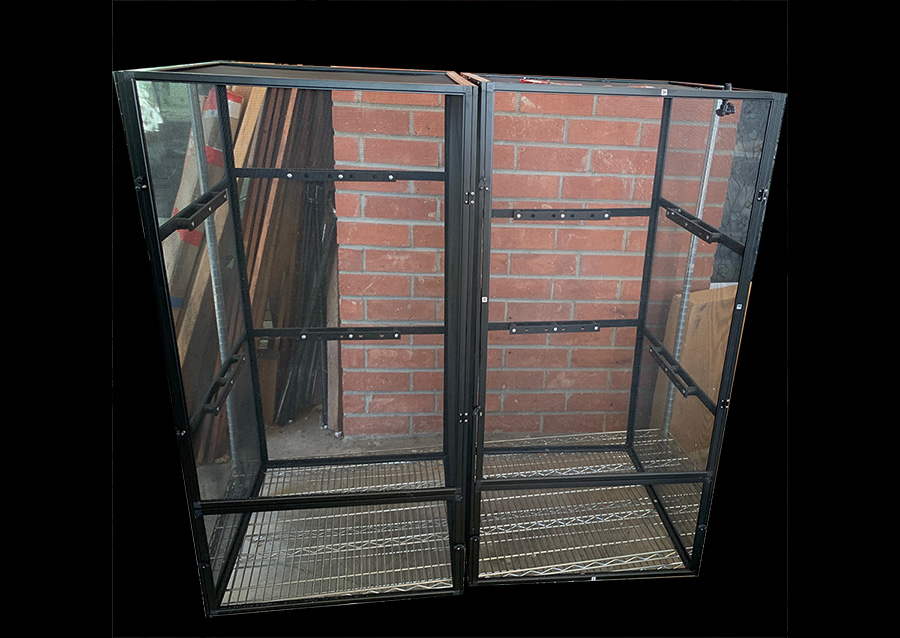
We are going to combine two standard 2’x2’x4’ cages together to give your chameleon a very roomy 4’x2’x4’suite to live in.
Give your chameleon the space to move around!
I think we can all agree that bigger is better when it comes to chameleon cages, but we need to discuss the shape of the cage. There seems to be an opinion that chameleon cages should have vertical space. As in, taller is better than wider. This is a result of manufacturing history – not chameleon husbandry.
Chameleons are horizontal animals. They like perching horizontal and they like moving horizontal. They will, of course, make use of three dimensions, but they would rather have horizontal moving room rather than vertical moving room in their cage. The reason why there is confusion is because chameleons also like height. But here is where we need to differentiate vertical moving room from cage height. They want to move horizontally high up. Their security is being above your head level. So they will be happiest if you give them a wide cage placed high up on a shelf. Keeping a chameleon in a 3’ wide 3’ tall Exo-Terra Large X-Tall screen cage would be stressful for your chameleon if the cage was on the floor. But if you put it on a shelf so the top of the cage was 6’ or 7’ above the floor then it is a much better cage than the 2’x2’x4’ cage sitting on the ground. But the Exo-Terra is only 18” deep. How about if we go all out and make a 4’ wide x 2’ deep x 4’ tall cage and put it up off the floor? That is what we are going to do today!
As with any project I need to use actual products so you all can follow along. In this case I am going to use the scenario where you already have a ZooMed reptibreeze XL, that is the 2x2x4, and we are going to add another one to the side. Because this will be a common scenario. And, I hope you appreciate that I, the owner of the Dragon strand Chameleon Caging Company went out and actually purchased two ReptiBreezes so I could do this project! Of course, if you are just starting out, feel free to get it all up front and start with a 4’ wide cage from the beginning! I have it all laid out for you to start in style!
How old does your chameleon need to be to go into a roomy cage?
I am glad you asked that question! You can put ANY age chameleon into a 4’ wide cage! There is no reason to be concerned about a juvenile chameleon finding food, heat, UVB, or water. They do it in the wild just fine! The only thing about a larger cage is that you may have to spend more time looking for them, but this is actually better husbandry as juvenile chameleons will have much more security if they have multiple hiding spaces! A larger cage is, without a doubt, better than a smaller cage for a juvenile chameleon! The fact is that once they feel secure in their cage you will see them every day just lounging around and if you feed them in the same place at the same time every day do not be surprised if you find them waiting at that location. A larger cage is much easier for you to create a good chameleon environment so, take any hesitation and toss it away. If you can give your baby chameleon a 4’x2’x4’ cage then jump at the chance to do it!
Your First Four Things To Think About
We would love to get to the fun part of merging the cages, but, there are somethings to figure out before we start that. Here are three things to prepare for ahead of time so your project gos smoothly.
1) Where will you put a 4’ wide cage?
The first thing you need to do is figure out where you will put a 4’ x 2’ x 4’ cage the important thing is that the bottom must be supported. Later on we will take care of mist proofing and drainage. Right now, it is where you will put it. Ideally it will go on a stand that will put the top of the cage at or above 6’. Putting your chameleon above it all is the best possible situation. Remember you can always get two 12” pine planks from the local hardware store, cut to 4’ lengths, and place those on top of any surface that doesn’t make 4’ wide or 2’ deep. Just make sure the cage doesn’t have any chance of toppling over with an earthquake, or dogs or kids bumping into the base!
You can get a baker’s rack. There are 5’ x 2’ deep bakers racks available on Amazon. You could use the 4’ x 18” rack if you use the wood planks on top to provide a full support. But the huge advantage of the 5’ rack is that you are able to have a wire shelf above the cage which is enormously helpful to put lights and foggers and such.
For this build I am going to show it using the 5’ x 2’x 6’ Baker’s rack.
2) Where will the waste water go?
Next, let’s deal with drainage. We want to be able to mist how ever many times and as long as we wish. For that we will need a drainage tray to catch the water and keep it away from the poop and escaped feeder insects inside the cage.
There is always the option of making your own planter box from wood and sealing it up against water leakage. This can give you a nice 12 inches of substrate to plant things in. But, I am going to go the easy route today and just get a drainage tray. Luckily we can find trays meant for other uses and adopt them. My favorite for these wide cages is to use the trays you put fake grass in so apartment dogs can have a place on the balcony to relieve themselves. The largest of these are perfect for our use! Well, not totally perfect. See we will need to raise the cage up out of the waste water. And for that, I am going to make a PVC pipe stand off that will fit inside the tray. It only takes some basic parts and you don’t have to cement them if you really don’t want to.
3) Accessories
We always like to put on accessories like Dragon Ledges and hydration mount before we assemble the cage and you certainly should do this with the cage you are adding on. Keep in mind which side will be ripped out so you don’t add the Dragon ledges to that side panel!.
If you already have a cage with Dragon Ledges then just take that side off and use it for the outside side of the new cage you are adding on. I added one two special Dragon Ledge sets to support this project. The first is three more back ledges if you already have a cage with a DragonLedge set and the second is a complete 8 piece set if you want to populate a double wide Reptibreeze from scratch.
4) Solid Sides
Will you want to have solid sides to allow you humidity control? Screen is 100% ventilation and, if you intend to close off the sides then it is easier to determine the method before assembly. There are two main effective methods that look halfway decent. The first is to apply shrink fit window insulation to the outside of the cage. This is what I will be demonstrating in this build. But if you believe that visual isolation is an advantage in your situation (perhaps this is going in a reptile room with chameleons you would not like to be in visual range), then you can install white coroplast walls. The Shrink fit window insulation is best put on after assembly. The coroplast is best put on before assembly.
If you have yet to install Dragon Ledges then you can cut a piece the size of the screen area and replace the spacer that comes with the Dragon Ledges. Just punch holes in the Coroplast for the Dragon Ledges screws to go through and the Dragon Ledge assembly will hold your coroplast sheet firmly in place.
If you have already installed the Dragon Ledges then you can add a coroplast wall in there pieces with cut outs for the Dragon Ledge pieces installed. These would be screwed onto the frame.
Shopping List
The shopping list below is as comprehensive as I could make it so you could use it as a reference to pick and choose what you needed. We reptile people tend to have a number of things laying around that could be substituted, but here is the list to pick and choose what you need.
Note 1: I am an affiliate with Amazon and Leap. A purchases from either one may result in a commission to me at no extra charge to you
Note 2: I own the Dragon Strand Chameleon Caging company which allowed me to create specific bundles to support this project
If you already have a Reptibreeze XL and you want to extend it to a 4x2x4 cage then purchase one of these. If you are starting fro scratch and would like to do this project them you will need two Reptibreeze XLs.
Addition Bundle
This is the product you would use if you were going to be adding on a cage to one that already has a set of Dragon Ledges. Just move the side with the Dragon Ledges to the outside of the new cage and use the new side panel for the inside. You will be removing the screen from them anyways!
This bundle includes the three additional back ledges and one Hydration Mount that can hold standard mist nozzles from either Mist King or Cli-Mist.
From-Scratch Bundle
This bundle contains four side ledges, four back ledges for the Reptibreeze XL and three Hydration Mounts
This bundle has been made specifically for keepers who are planning on making a 4x2x4′ cage using two ZooMed Reptibreeze XL cages and do not yet have any Dragon Ledges.
This bundle includes the three Hydration Mounts that can hold standard mist nozzles from either Mist King or Cli-Mist.
Cage Mending Components
Title
This is the plastic sheeting you will cut strips from to mend the two cages together.
These are the screws that I use to attach the coroplast strips to the frame of the cage. a 50 piece bag needs to be used strategically to make sure you do not run out of screws. I would suggest getting two bags of these screws (100 pieces) so you do not have to think about it.
100% silicone
This silicone is to fill in the 1/8″ gap between the cages. You can use black or clear. This particular one is clear because it is meant for aquariums. I am recommending this one as it is proven safe for animals. I suspect the black adhesives will work just fine, but this is the safe route!
Preparing for the Build
I am covering two main scenarios here. The first is if you already have a Reptibreeze XL set up and the second is if you are starting from ground zero, but think this project is exactly what you would like to start with!
Dragon Ledges
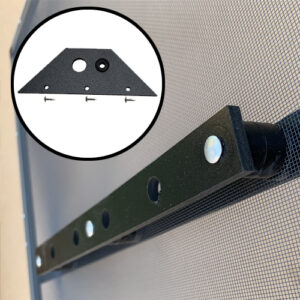
It is much easier to install Dragon Ledges if you put them on the panels before you assemble the cage. I have added two new sets to the Dragon Strand website do you can purchase a set to populate the two sides and two back panels of a completely new build or, if you are adding a cage to one that already has Dragon Ledges, three back Dragon Ledges. Note that the back braces for the back panel are actually shorter than for the sides because the back panel is actually not as big as the side panels. Side Dragon Ledges can be made to work for the back, but they are not optimized and will make the mending strips more tricky to install because they will interfere with doing one nice piece.
If you are expanding a cage that already has Dragon Ledges on it then there is no need to remove the Dragon Ledges from one side of your cage to put them on the second XL. Simply remove the side that is going to be in the middle and use that side panel with Dragon Ledges for the side of the new cage. Use the screws that come with the cage for this.
Attach Dragon Ledges to all the appropriate new panels that are not yet assembled. To add Dragon Ledges to panels that have already been assembled, hold the Dragon Ledge Back Brace in place with masking tape and then drill pilot holes where the screws need to go. A pilot hole is a hole that is about half the diameter of the screw. This allows the screw to get started easily, but still have the full grip strength once it is in. This method makes installing Dragon Ledges on a vertical panel much easier. You can put the cage on its side when installing the Dragon Ledges, but I recommend extreme caution when doing this because the cage structure was not designed to have strength in that direction and you could warp the cage with the force of driving in a screw into the aluminum frame.
Hydration Mounts
The mounts that hold the misting nozzles, are pretty straight forward. Just install the ones you want on the new cage side top panel before you do the assembly of the new cage. Misting nozzle mount hardware from Mist King or Cli-Mist must be installed in the corner of the top panel. The Hydration Mount from Dragon Strand can be mounted anywhere along the inside top frame. The Dragon Strand Hydration Mount was designed specifically for wide format cages where corners were too far apart from each other to provide adequate coverage in a 4’ wide cage. But in the case of this build there are corners in the middle so, if you have Mist King wedges they can be used effectively with this project. The hydration mount fro Dragon Strand has the additional feature of a grommeted input for 1/4” tubing in case you decide you would like to install a plant drip watering system anytime in the future. If you are ordering Dragon Ledges for your project then you can select the version that bundles hydration mounts with the Dragon Ledges.
Just like the Dragon Ledges, it is easier to install misting mounts with the top panel flat against the ground. If you have to install the misting mount on an assembled cage, then it helps to hold the mount in place with masking tape, drill a pilot hole, and then drive in the screws. Beware that doing this upside down can inspire flowery language.
Mending the cages

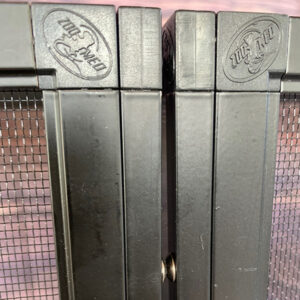
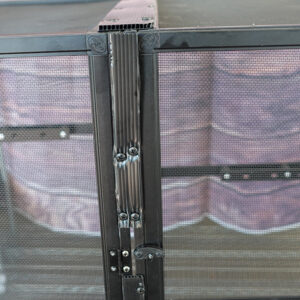
The cages will not sit flush together with the pan head screws included with the cage, but a 1/8” gap just happens to be exactly what we need between the cages to allow the latches to swing freely. You’ll notice quickly that the latches will interfere with the hinges of the other cage which are at the same level.

Carefully measure how thick of a strip you are cutting. the front requires a thin strip of 3/8″ and will be tricky to get exact. The top and bottom can each be a comfortable 24″ long x 1 3/4″ wide strip. You can do long 3/8″ wide strips down the back and they will avoid the Dragon Ledges. Alternatively, you could do a patchwork of 1 3/4″ strips and dodge the Dragon Ledges. Putting all these mending strips around the double wide cage seam is the trickiest part of the entire project.
The force necessary to drive the screws into the aluminum frame invites a slip of the screw driver and a hole in the screen. So I suggest drilling a pilot hole with a drill bit half the width of the screw. Masking tape is your friend in all of this and can hold down strips of coroplast while you are getting the right placement and getting the screws started.
Although you will see all the strips fro the front, this does leave a 1/8” crevice in between the cages all the way around for feeder insects to hide and spiders to get comfortable. Therefore, I cut a 1/2” wide strip of coroplast and insert it in between the cages. This can be done after all the mending strips have been attached. Though I suggest putting at least the front spacer strip in while you are attaching the mending strips because there are no screw heads to maintain the correct distance. So I use my spacer strip to keep the two cages apart when I am merging the front side. The 1/2” wide coroplast strip fills in a good amount of the gap, but areas with the pan head screws will still be present. So I got a tube of aquarium silicone and put a bead of silicone all the way around the inside seam.
Drainage Tray
This is Drainage tray which the cages can sit on top of


